TiviMate Complete Setup & Best Settings (2026)
Updated July 13, 2026 · 14 min read · First published July 2026
Install TiviMate from Google Play on Android TV, or sideload it on Firestick with Downloader code 272483. Add your subscription with an Xtream Codes login (server URL, username, password), let the EPG import, then set Buffer size to Large and Decoder to Hardware. Premium (~$9.99/year or ~$34 lifetime via TiviMate Companion) unlocks recording, favorites, and multiple playlists.
TiviMate is the IPTV player most streaming veterans end up on. It is built specifically for TV screens and remote-control navigation, it handles huge channel lists without choking, and its grid-style TV guide is the closest thing to a real cable box experience you can get from an app. If you have compared players — see our TiviMate vs IPTV Smarters Pro breakdown — you already know why it keeps winning: speed, a clean guide, and deep customization once you know where the settings live.
That last part is the catch. TiviMate does almost nothing for you out of the box. The default buffer is too small for high-bitrate streams, the free version hides its best features behind an unlock prompt, and the settings menu is deep enough that most people never find the three or four toggles that actually matter. This guide fixes that. We will install TiviMate the right way on Firestick and Android TV, connect your StreamVega subscription with the login format that works best, configure the TV guide, and then walk through the nine settings worth changing — with the reason behind each one. Everything below is verified against TiviMate version 5.3.3, the current release as of mid-2026.
What you need before you start
TiviMate runs on Android TV OS devices: Fire TV Stick (all recent models), onn. Google TV boxes, NVIDIA Shield, Chromecast with Google TV, and most Android TV smart TVs (Sony, TCL, Hisense with Google TV). It is designed for televisions — the developer does not fully support phones or tablets, and there is no iOS version at all. If your main device is an Apple TV or iPhone, pick a different player from our best IPTV player for Firestick roundup instead.
You also need an active IPTV subscription. TiviMate is only a player — it ships with zero channels and expects you to bring your own service. If you do not have login details yet, grab a free 24-hour trial from StreamVega: the confirmation email contains the three things TiviMate asks for — a server URL, a username, and a password (this trio is called an Xtream Codes login), plus an M3U URL as a fallback. Keep that email open on your phone while you set up; you will type those values in shortly.
Finally, a note on internet speed. A single 1080p IPTV stream needs roughly 10 Mbps of stable bandwidth and a 4K stream needs 25 Mbps or more. If your Firestick is on Wi-Fi at the far end of the house, fix that before blaming the app — our IPTV buffering guide covers the network side in detail.
- ✓Setting up for the first time? Do it during the trial window so you can test everything — channels, guide, catch-up — before paying for a full subscription.
Install TiviMate (Firestick and Android TV / Google TV)
Android TV / Google TV first, because it is the easy case. On NVIDIA Shield, Chromecast with Google TV, onn. boxes, and Google TV-powered smart TVs, TiviMate is on the official Google Play Store: search for 'TiviMate' on your device or open the official listing at TiviMate IPTV Player on Google Play. Confirm the package is ar.tvplayer.tv, press Install, and you are done — Play Store installs also update automatically. While you are there, note the separate TiviMate Companion app for phones; it is the only official way to buy Premium, covered later in this guide.
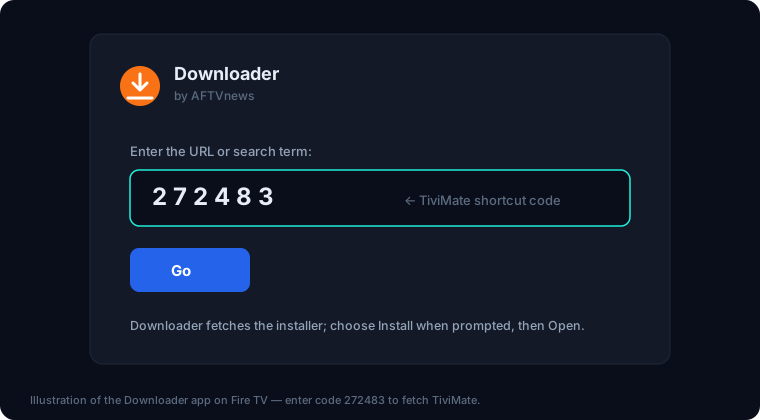
Firestick is different: TiviMate is not in the Amazon Appstore, so on any Fire TV device you install it manually — a five-minute process Amazon officially allows, using the free Downloader app. The developer publishes an official Downloader code (272483) that always points at the current APK, so you never have to hunt for a trustworthy download link. This is the same sideloading routine covered in our broader how to install IPTV on Firestick guide; here is the TiviMate-specific version.
- 1From the Firestick home screen, open the search (magnifying glass), type Downloader, and install the orange Downloader app by AFTVnews from the Appstore.
- 2Enable developer options: go to Settings > My Fire TV > About, highlight your device name, and click it seven times until you see 'You are now a developer'.
- 3Go back to Settings > My Fire TV > Developer Options > Install Unknown Apps, and toggle Downloader to ON.
- 4Open Downloader, click into the URL field, type the code 272483, and press Go. Downloader fetches the official TiviMate APK automatically.
- 5When the download finishes, press Install, wait for 'App installed', then choose Done (not Open).
- 6Back in Downloader, press Delete twice to remove the leftover APK file — it just wastes the Firestick's limited storage.
- 7Find TiviMate under Your Apps & Channels (press and hold the Home button > Apps), and move it to the front row.
- ✓On older Fire OS versions the menu is Settings > My Fire TV > Developer Options directly — if you don't see Developer Options at all, do the 'click the device name seven times' step first.
- ✓Since sideloaded TiviMate updates outside the Appstore, you update it the same way: re-enter code 272483 in Downloader and install the new version over the old one. Your settings and playlists are kept.
- ✓NVIDIA Shield owners: TiviMate plus a Shield is widely considered the best-performing IPTV combo — the Shield's hardware decoder handles 4K/60 streams that make cheaper sticks stutter.
Add your StreamVega login (Xtream Codes first, M3U as backup)
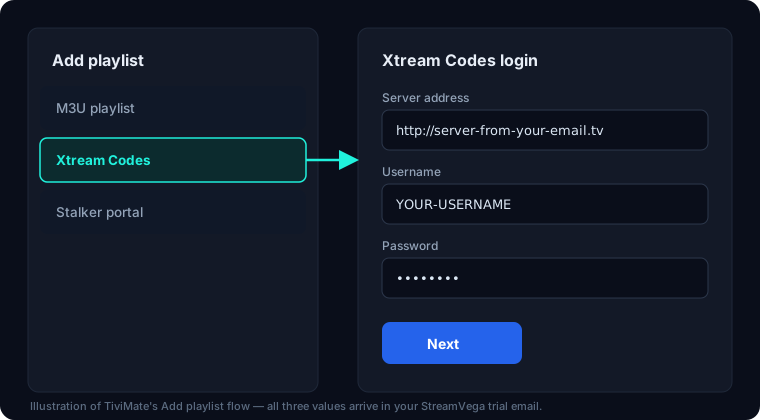
The first time you open TiviMate it goes straight to the Add Playlist screen. You will see several options — the two that matter are Xtream Codes login and Enter URL (M3U). Use Xtream Codes if your provider supports it (StreamVega does). With an Xtream login, TiviMate uses the provider's API to pull the channel list, the movies/series (VOD) catalog, and the matching EPG guide data in one shot — no separate guide URL to configure, faster refreshes, and less bandwidth than re-downloading a giant M3U file every update.
Your Xtream credentials are the server URL, username, and password from your StreamVega welcome email — the same ones sent with the free 24-hour trial. Type them exactly as sent; the most common first-day failure is a typo'd URL or a stray space at the end of the username. If channels import but something looks wrong, run your login through our subscription checker to confirm the line is active before troubleshooting the app.
- 1Open TiviMate and select Add playlist.
- 2Choose Xtream Codes login as the playlist type.
- 3Enter the Server URL exactly as it appears in your StreamVega email, including the http:// prefix and the port number if one is shown.
- 4Enter your Username and Password, then select Next.
- 5Wait while TiviMate imports the channel list — typically 1 to 2 minutes for a full lineup. Do not back out mid-import.
- 6Give the playlist a name you will recognize (e.g. 'StreamVega'), confirm, and let the EPG download finish on the next screen.
- 7M3U alternative: if you were only given an M3U link, choose Enter URL instead at step 2, paste the full M3U URL with no trailing spaces, and add the EPG URL separately when prompted (see the EPG section below).
- ✓Xtream Codes login vs M3U is purely about how TiviMate talks to the server — the channels are identical. Prefer Xtream; keep M3U for players or devices that don't support Xtream logins.
- ✓If the import stalls at 0% or errors out immediately, the usual causes are a mistyped server URL or your ISP interfering with the connection — our TiviMate not working guide walks through the fixes in order.
Set up the EPG (TV guide) properly
The EPG — the grid guide showing what's on now and next — is TiviMate's headline feature, and with an Xtream Codes login it mostly configures itself: TiviMate fetches the provider's guide data automatically after the playlist imports. If you used an M3U URL instead, you may need to add the XMLTV guide URL manually: go to Settings > EPG, choose Add EPG source, and paste the EPG/XMLTV link from your StreamVega email.
What is worth adjusting is how TiviMate maintains the guide. The defaults keep more stale data than you need and re-download the guide at app launch, which makes startup feel slow. Four EPG settings are worth changing, all under Settings > EPG:
Update interval: set to 24 hours. Guide data rarely changes more than daily, and pulling it more often just burns bandwidth and provider API calls. Past days to keep: set to 1. Old guide data only exists to support catch-up scrolling; one day back is plenty and keeps the guide database small and fast. Update on app start: set to Off. This is the setting that makes TiviMate feel sluggish at launch — with a 24-hour interval the guide updates in the background anyway. Update on playlist change: leave On, so a playlist refresh always re-syncs guide data.
If guide cells show 'No information', give it one full update cycle first (or force one via Settings > EPG > Update now). Persistent gaps on specific channels usually mean those channels lack EPG mapping on the provider side — report them and we fix the mapping, since guide data comes from the service, not the app.
- ✓Keep at least 1 GB of free storage on your device. TiviMate processes EPG updates in the background, and low storage is a sneaky cause of guide updates silently failing on 8 GB Firesticks.
The 9 TiviMate settings worth changing (and why)
TiviMate has dozens of settings; most are fine on defaults. These nine are the ones that measurably improve daily use. Menu paths are from TiviMate 5.x — open Settings from the left-hand panel (press left on the remote from the guide, or the gear icon).
1. Buffer size — Settings > Playback > Buffer size. Change from the default to Large for 1080p streams, or Very large if you watch 4K. A bigger buffer gives the app a deeper reserve of downloaded video, so brief network dips don't interrupt playback. This is the single most effective anti-buffering change inside the app; if streams still stutter afterwards, the problem is network-side — see how to fix IPTV buffering.
2. Decoder — Settings > Playback > Decoder. Set to Hardware. Hardware decoding runs video through your device's dedicated video chip instead of the CPU. Software decoding makes Firesticks run hot and throttle, causing stutter that looks like buffering but isn't. Only fall back to software (or the AV1/auto option, if present on your build) if a specific channel shows a green or garbled picture on hardware.
3. EPG update interval — Settings > EPG > Update interval: 24 hours, as covered above. 4. Update on app start — Settings > EPG: Off, so TiviMate opens instantly instead of grinding through a guide download.
5. Confirm exit — Settings > General. Turn On. The back button on a remote is easy to overpress; this stops you from accidentally closing the app (and killing an in-progress recording) from the guide screen.
6. Start with last channel — Settings > General (playback-on-launch behavior). Turn On if you want TiviMate to behave like a cable box: power on, and your last channel is already playing instead of landing on a menu.
7. Guide appearance — Settings > Appearance > TV guide. Bump Number of rows up (7-9 works well on a 50-inch-plus TV) and enable channel numbers. More visible rows means less scrolling through a multi-thousand-channel lineup.
8. Parental controls — Settings > Parental controls. Set a PIN and lock adult groups if kids use the TV. Locked groups disappear from the guide until the PIN is entered. (Premium feature.)
9. Recording storage — Settings > Recording (Premium, and only after plugging in storage). On a Firestick, internal storage is far too small for recordings — 8 GB total on the standard stick, much of it already used. Attach a FAT32-formatted USB drive via an OTG adapter and point recordings at it; an hour of HD video eats roughly 2-4 GB. On an NVIDIA Shield or Android TV box with USB ports, any attached drive works the same way.
Change these nine, restart the app once, and you have effectively 'tuned' TiviMate — everything else is taste.
- ✓After changing buffer or decoder settings, fully close and reopen TiviMate before judging the result — playback settings apply cleanly on a fresh stream.
- ✓Resist the urge to max the buffer on low-RAM devices: on an 8 GB/1 GB-RAM Firestick Lite, Very large buffers can cause the app to reload under memory pressure. Large is the sweet spot there.
Favorites, groups, and hiding channels you never watch
A full IPTV lineup can run past ten thousand channels, and nobody scrolls that daily. The workflow that makes TiviMate pleasant is: hide the groups you never watch, then build one or two favorites lists that hold your real rotation. Fifteen minutes of setup here saves you scrolling every single day.
Groups first. Your StreamVega playlist arrives pre-sorted into country and genre groups (US Entertainment, UK Sports, CA News, and so on). Go to Settings > Playlists > your playlist > Manage channel groups (called Groups/Categories in some builds), and simply untick every group you will never open — foreign-language regions, shopping, and so on. Hidden groups vanish from the guide and the channel list but are never deleted; re-tick them any time. This also makes the guide render faster, since TiviMate draws fewer rows.
Favorites next (Premium). Highlight any channel in the guide or channel list, long-press the OK/select button, and choose Add to favorites. TiviMate supports multiple favorites lists — create one per person or per mood (Sports, Kids, News) via the favorites management screen. Your favorites appear as their own group at the top of the guide, so your twenty real channels are always the first thing you see. You can also reorder channels inside a favorites list from the same long-press menu, putting your number-one channel at position one.
The long-press menu on a channel is generally the power-user hub: favorites, custom recording, hiding a single channel, and channel info all live there. If you learn one gesture in TiviMate, make it long-press OK.
- ✓Do group cleanup before building favorites — hiding a group does not remove channels already added to a favorites list, so hide aggressively and favorite selectively.
Backup your setup (and keep TiviMate updated)
After you have spent an evening dialing in settings, groups, and favorites, protect that work. TiviMate Premium includes backup and restore: open Settings, select Backup/Restore, and create a backup. TiviMate writes a single .zip file containing your settings, playlists, favorites, and layout. You can save it to internal storage or a USB drive — and it is smart to copy that .zip off-device (upload it to Google Drive or move it to a PC), because a backup that lives only on the Firestick dies with the Firestick.
Restoring is the reverse: install TiviMate on the new or reset device, get the .zip onto it (USB drive, or download from your cloud storage), choose Restore in the same menu, point it at the file, and restart the app. Your entire setup — including your StreamVega login — comes back in under a minute. This makes moving from an old Firestick to a new one, or recovering from a factory reset, a non-event. Note that your Premium unlock itself is restored by signing into your TiviMate Companion account, not by the backup file.
On updates: Google Play installs update automatically. Firestick sideloads do not — every month or two, re-run Downloader code 272483 and install the newer APK over the top; playlists and settings persist. TiviMate is at version 5.3.3 as of June 2026, and staying reasonably current matters because point releases regularly fix EPG and codec issues. If an update ever breaks something on your device, take a backup before updating so rolling back is painless — and check our TiviMate not working guide, which we keep current with known version issues.
That is the complete setup. If anything misbehaves along the way — login errors, missing guide data, buffering — start with the subscription checker to rule out the account, then work through the troubleshooting guide. And if you are still on the fence about the player itself, our TiviMate overview and the TiviMate vs IPTV Smarters Pro comparison cover how it stacks up.
- ✓Take a fresh backup whenever you finish a meaningful settings session — it takes ten seconds and turns any future device swap into a one-minute job.
Key takeaways
- →TiviMate (v5.3.3 as of mid-2026) installs from Google Play on Android TV/Google TV, but must be sideloaded on Firestick with the Downloader app and code 272483.
- →Use the Xtream Codes login option instead of a raw M3U URL — it pulls channels, VOD, and the EPG in one step and refreshes faster.
- →The two settings that fix most playback problems: Buffer size (Large for 1080p, Very large for 4K) and Decoder set to Hardware.
- →TiviMate Premium costs about $9.99/year or ~$34 one-time for 5 devices, bought through the separate TiviMate Companion app — it unlocks recording, favorites, catch-up, multiple playlists, and backup/restore.
- →Set the EPG update interval to 24 hours and turn off update-on-app-start so the guide stays fresh without slowing down launch.
FAQ
- Is TiviMate free, or do I have to pay?
- TiviMate is free to install and free to use for live TV from one playlist with the full EPG. Premium — about $9.99/year or ~$34 lifetime for up to 5 devices — unlocks recording, favorites, catch-up, multiple playlists, backup/restore, multiview, and parental controls. The app itself never includes channels; you supply those with an IPTV subscription like a StreamVega free 24-hour trial.
- What is the Downloader code for TiviMate on Firestick?
- The official TiviMate Downloader code is 272483. Install the Downloader app from the Amazon Appstore, allow it to install unknown apps in Settings > My Fire TV > Developer Options, then enter 272483 in Downloader's URL field to fetch and install the current TiviMate APK directly from the developer.
- Why is TiviMate not in the Amazon Appstore?
- The developer has never published TiviMate to Amazon's store, so Fire TV users install it by sideloading — a normal, Amazon-permitted process using the free Downloader app and code 272483. On Android TV and Google TV devices, TiviMate is available normally on the Google Play Store and updates automatically.
- Should I use Xtream Codes login or M3U URL in TiviMate?
- Use the Xtream Codes login (server URL + username + password) whenever your provider supports it. It imports channels, VOD, and the EPG together, refreshes faster, and uses less bandwidth than re-downloading a large M3U file. Keep the M3U URL as a backup for players or devices that don't accept Xtream logins — the channel lineup is identical either way.
- How do I record on TiviMate with a Firestick?
- Recording requires TiviMate Premium plus external storage — a Firestick's internal storage is far too small. Connect a FAT32-formatted USB drive with an OTG adapter, set it as the recording location in TiviMate's recording settings, then long-press a program in the guide to schedule a recording or record instantly. Budget roughly 2-4 GB per hour of HD video.
- Why does TiviMate keep buffering even after setup?
- Inside the app, set Buffer size to Large (Very large for 4K) and Decoder to Hardware under Settings > Playback — those two fix most in-app stutter. If buffering continues, the cause is almost always network-side: Wi-Fi signal, ISP throttling, or router congestion. Work through our IPTV buffering guide, and test your line with the StreamVega subscription checker to rule out an account issue.
Related guides
Try it yourself — free for 24 hours
No credit card. We send your login by email or WhatsApp, usually within minutes.
- No credit card
- Login in minutes
- Cancel anytime